- Confirm the work order, brand, job type, address, and appointment.
- Pack the assigned equipment, accessories, backup equipment, and correct forms.
- Know the required contact, activation, testing, and dispatch process.
PERS TECHNICIAN TRAINING
Know the job.
Own the visit.
Build the knowledge and confidence to prepare for each visit, install and test the equipment, complete the required paperwork, and properly close out the job.
QUICK TECHNICIAN HELP
Search the entire training site
Search equipment, paperwork, forms, field references, FAQs, checklists, job types, or support information.
TECHNICIAN LOGIN
Log in to continue
Use the same name and email each time. New technicians will begin or resume required training. Technicians who have completed training will open the full reference website.
ALWAYS-READY CHECKLISTS
Quick appointment guide
- Confirm the required test is complete and successful with a live agent.
- Explain range testing to the subscriber and finish signatures, dates, serials, notes, and uploads.
- Report the appointment result and required follow-up in your assigned dispatch channel.
WELCOME TO SERVICE POINT
Start every visit with the right standard
Your first jobs may feel like a lot to remember. This training gives you an approved path to follow. Your job is to arrive prepared, treat the subscriber and their home with care, complete the work safely, and leave a clear record of what happened.
YOUR ROLE
Be professional, follow the assigned work order, install only approved equipment, test the complete system, teach the subscriber, and communicate the result. When something does not match, pause and ask—do not guess. Business-casual dress is required.
TIME-SENSITIVE ORDERS
Every order needs a timely, documented update
48 hours
Provide the first documented update in your assigned dispatch channel within 48 hours of receiving the order. If no update has been reported, the Service Point team will contact you for one.
3–5 business days
Complete the installation within three to five business days of receiving the order unless an approved, documented barrier prevents completion.
3 attempts minimum
Review the entire ticket and contact the primary number and all available alternate numbers. Make at least three contact attempts when needed and report each result in your assigned dispatch channel.
More than 1 week out
If the subscriber requests a scheduled date more than one week away, report the date and the subscriber’s explanation in dispatch so Service Point can update the agency. These installations are time sensitive.
DISPATCH UPDATE GUIDELINES
Every update must provide a clear job record
Post every update in your assigned dispatch channel. The channel allows any available team member to update the ticket. Your post will be marked after a dispatcher confirms it and updates the ticket.
Subscriber
Include the subscriber's full first and last name.
What happened?
Identify the 1st, 2nd, or 3rd attempt. Reference every number called, including alternate contacts.
- Left voicemail
- No voicemail option
- Voicemail full
- Number out of service
- Wrong number or voicemail name does not match
- A person answered and does not know the subscriber
- Scheduled for Thursday 9/25 between 9:00–11:00 a.m.
- Emergency contact requested scheduling next week
What is next?
State the next attempt, scheduled appointment, help needed, delay reason, or expected follow-up.
Use text messages as well as calls. Unknown-number blocking and scam concerns may prevent calls from reaching the subscriber.
After three attempts: If you have tried every number in the
ticket three times, request an alternate number in dispatch. The
Service Point team can contact the agency or case manager to help
reach the subscriber and obtain another scheduling contact.
Privacy: Never post subscriber details, medical information,
or paperwork in a public or general Slack channel. Use only your
assigned dispatch channel and include only the
information needed to document the job.
Dispatch post examples
- John Smith: Left voicemail and sent text. Alternate contact 1 is out of service. Spoke with alternate contact 2, who will ask the subscriber to contact me. Next step: follow up tomorrow.
- John Smith: Scheduled Thursday 9/25 between 9:00–11:00 a.m.
- John Smith: Waiting on inventory ordered XX/XX. Next update: XX/XX.
- John Smith: Requested a callback next week because he is currently unavailable. Next attempt: XX/XX.
Know the job before you go
Read the entire work order. Confirm the program, job type, address, appointment details, contact instructions, assigned equipment, and required paperwork before traveling.
Communicate clearly and on time
Call the main number first, then supplemental contacts unless instructed otherwise. Report every attempt with the subscriber’s full name, date, and factual result in your assigned dispatch channel.
Bring the right equipment—and a backup
Verify the model, accessories, condition, and paperwork before the visit. Always bring appropriate backup equipment in case an approved change is needed while onsite. Be prepared to resolve the visit without a return trip, but never substitute equipment or use another model’s procedure without approval. Any device change from the original order must be approved by Activations, not the Service Point dispatch team.
Respect the subscriber and home
Introduce yourself, explain the visit, protect the work area, keep cords and walking paths safe, and use subscriber information only for the assigned job and approved workflow.
Activate and install safely
Use the correct activation route and attach the Unit ID or CSID before installation. Use a direct wall outlet—never an extension cord or three-way adapter—for safer, more stable power, and choose a safe location with reliable service. Do not install the unit beside a television, microwave, or other loud appliance; noise can prevent the subscriber and live agent from hearing one another.
Test and teach before leaving
Confirm the device has sufficient signal, then complete the required test with a live agent. Explain range testing to the subscriber; technicians do not perform the range test. Show the subscriber how to use, charge, wear, and test the equipment.
Make the paperwork complete
Record the CSID or Unit ID accurately and legibly on the correct form. Collect required signatures and dates, and upload clear, readable documents or required proof photos.
Pause, document, escalate
If the work order, equipment, activation, testing, or paperwork does not match, stop and document the exact issue. Contact Service Point dispatch before continuing or closing the job.
BEFORE YOU BEGIN
What “job complete” means
The correct system is installed and tested, the subscriber knows how to use it, and all required paperwork or proof is readable and submitted. Report the appointment outcome; Service Point reviews the documentation before marking the work order complete.
EQUIPMENT TRAINING COURSE
Learn the units before the visit
Complete these lessons in order. Each lesson explains how to identify the equipment, set it up, pair accessories, and teach the subscriber.
0 of 11 lessons complete
Training resource update — September 16, 2026: This course
follows the consolidated Field Training & Knowledge Hub. Repeated
rules appear once in the field standard; each unit lesson focuses
on identification, setup, testing, and model-specific exceptions.
Every installation begins the same way
- Call the main number first, then supplemental contacts unless the work order says otherwise.
- Post the subscriber's full first and last name and call result in your assigned dispatch channel so notes are applied to the correct order.
- At the home, call Activations to attach the Unit ID/CSID to the account.
- During activation, turn the unit volume up and confirm the subscriber can clearly hear the unit's announcements and the activation operator.
- Use a direct wall outlet—never an extension cord or three-way adapter.
- Complete the approved checklist and upload the completed forms to your assigned dispatch channel.
Call Activations only after confirming the subscriber is home.
Activation must be completed inside the home unless advance
activation was specifically approved.
Wearable safety: All wearable help buttons are
water-resistant and should be worn in the shower or tub,
where many falls happen. Teach this at every installation. Do not
describe a device as waterproof or tell the subscriber to submerge
it unless its approved guide specifically permits submersion.
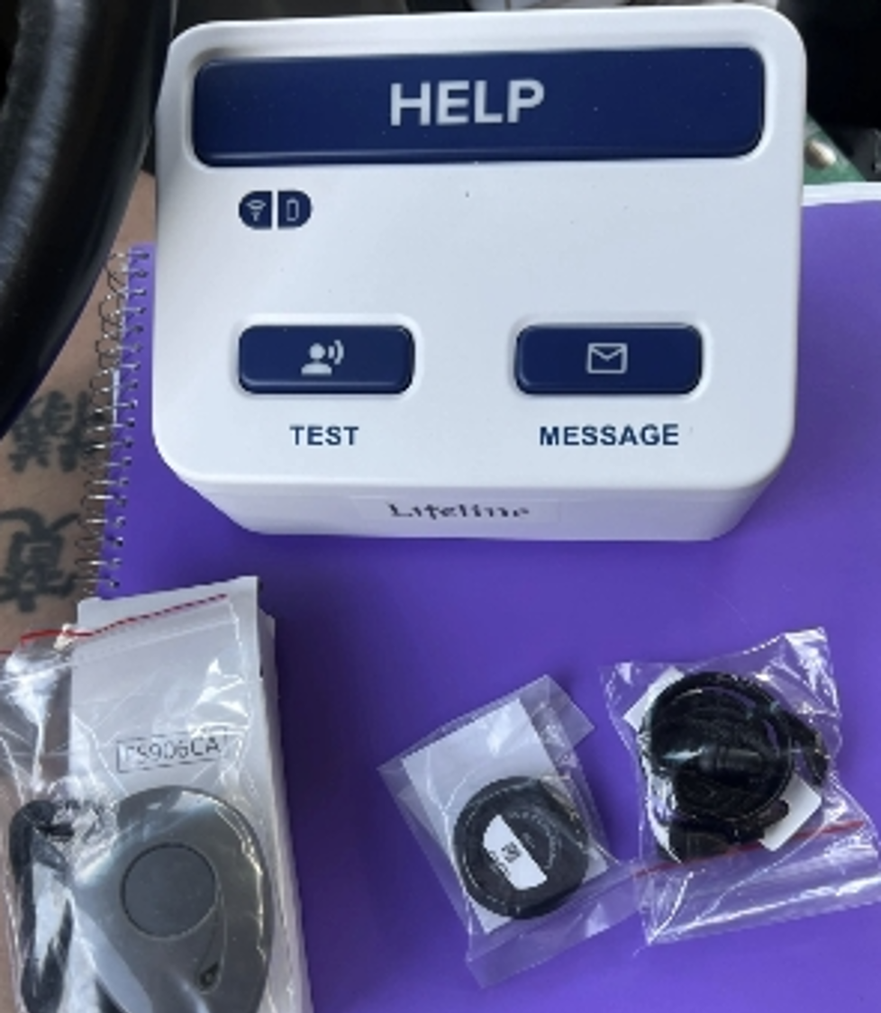
Know it: Lifeline and Connect America–AMAC both use this unit, but their pendant procedures are different. The serial number identifies the brand.
Lifeline Assure
- The unit and pendant arrive separately.
- The pendant is not pre-paired.
- Activate the unit first, then pair every pendant.
Connect America Assure
- The pendant is shipped in the box with the unit.
- The included pendant should already be paired.
- Service orders may require pairing a new pendant.
Pair a pendant when required
- Hold the Test and Message buttons together until the unit beeps.
- While holding them, press and hold the pendant button until the unit announces “Paired.”
- Confirm the unit announces “Paired.”
Required test: Always complete the test using the
pendant—not the Help button on the base unit.
Pendant check: Fall-detection packaging says FS906. A
regular personal help button says HALO906 on the back.
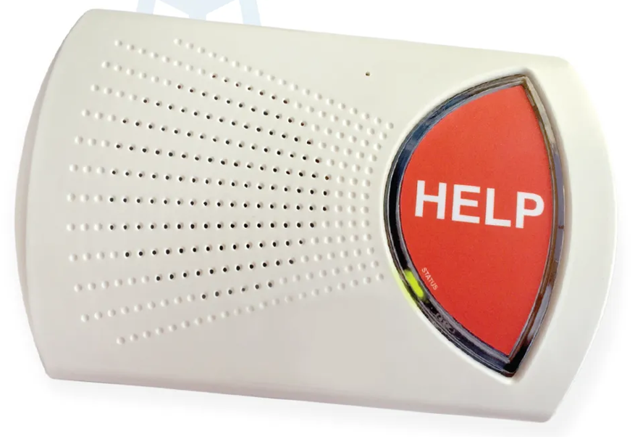
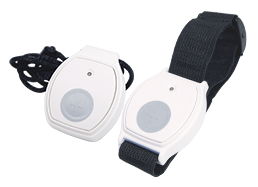
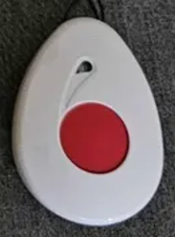
Know it: CA Core is the primary current provider, though CA–AMAC has used it. Regular buttons work with both Mytrex Cell and Mytrex Landline. The documented white teardrop pendant with a red center provides fall detection and is also compatible with both CA Mytrex models.
Pair a pendant
- Press Reset once. Listen for “LTE signal strength, system ready.”
- Press Mode twice.
- Press Help twice.
- Press the new transmitter. Listen for “Zone [number] device paired.”
- Press Reset.
Remove all pendants
- Press Mode three times.
- When prompted, hold Help until the unit announces the wireless help button was deleted.
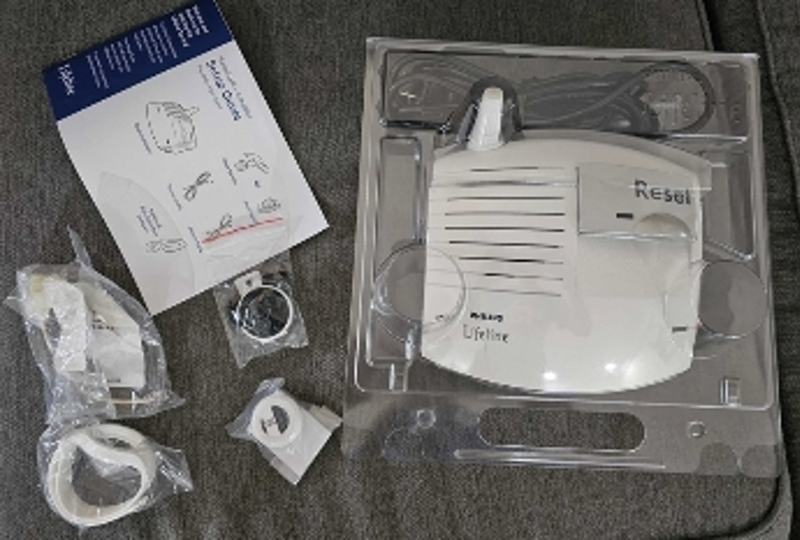
Know it: Lifeline is the only provider listed for this device.
Connect and pair
- Plug the subscriber's phone cord into the console's Phone jack.
- Plug the provided cord into the console's Line jack and the wall phone jack.
- While turning the unit on, hold the red Help button to bypass customer mode.
- Hold Reset until the console beeps. Keep holding Reset and press the pendant.
- Listen for the second beep confirming the pendant is paired.
Pendant check: Fall-detection packaging says FS312. A
regular personal help button says 312 on the back.
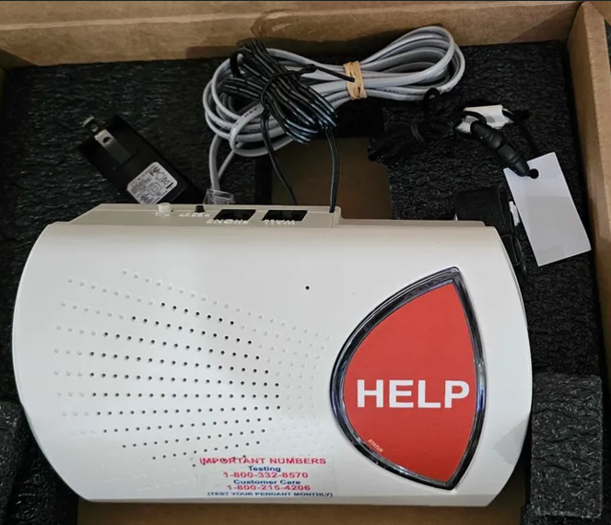
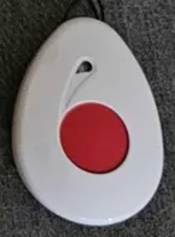
Know it: CA Core and CA–AMAC offer this landline unit. Serial numbers identify the brand. Each zone holds four buttons. Regular Mytrex buttons and the documented white teardrop/red-center fall-detection pendant work with both Mytrex Landline and Mytrex Cell.
Clear and pair pendants
- Press T/L once, then press Help five times.
- On the sixth Help press, hold it until the unit announces “Transmitters cleared.”
- Press Reset once, T/L once, and Help once.
- Press each pendant once. The unit beeps loudly for each learned pendant.
- Press Reset to finish.
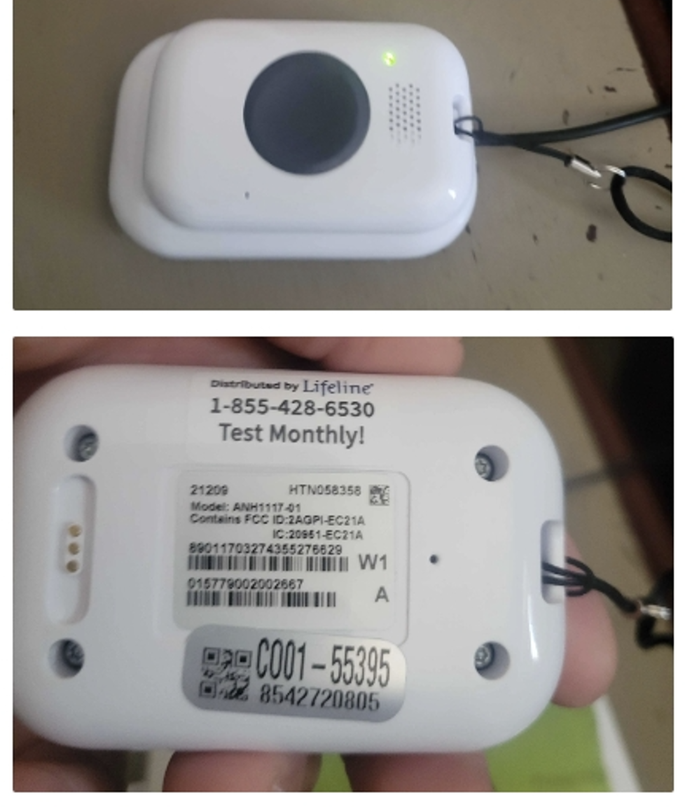
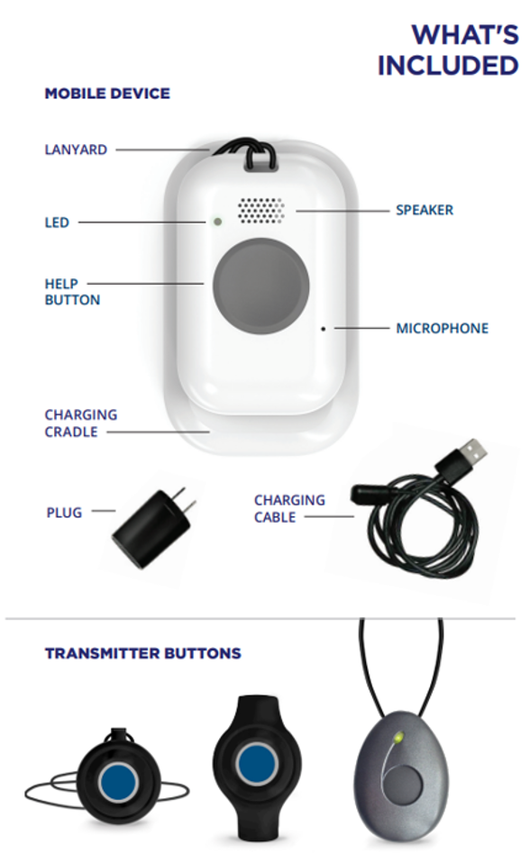
Know the difference: The OTG and Anelto LTE are very similar mobile units. The Anelto LTE includes a separate wearable button; the OTG does not.
OTG
- Install the AT&T OTG unless the work order specifically says Verizon.
- CA AT&T units generally have an OTG serial prefix. Verizon units generally have an OTV prefix or a Verizon identifier on the packaging.
- If the work order calls for FD/fall detection, ask Activations to enable it in the unit.
- Complete activation, live testing, charging instruction, and subscriber education before leaving.
Anelto LTE wearable pairing
The Anelto LTE is the mobile unit with a separate wearable attachment. The Anelto FD pendant provides fall detection for both the AMAC Assure and the Anelto LTE unit.
- Press the Anelto LTE unit button five times.
- Press the help pendant or fall-detection pendant button.
- Listen for the pairing-complete announcement.
Cradle pairing—only when specifically needed
- Place the Anelto LTE in the cradle.
- Press the handheld device's Help button four times and listen for “Pairing.”
- Unplug and reconnect the power cord. Listen for “Pairing complete.”
Pair the wearable and cradle separately. Cradles arrive
pre-paired unless the work order or support team says otherwise.
CA wearable inventory: An unused wearable button from an
installation may be retained for a later button-replacement work
order.
Watch the approved installation video ↗
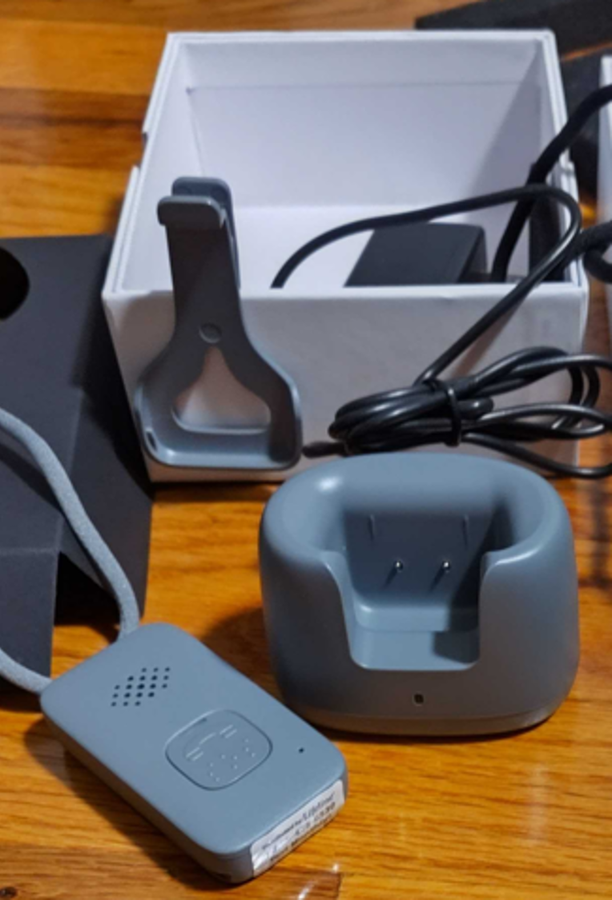
Know it: The gray Micron uses the same setup as the regular OTG and includes its own belt clip. It is available only on AT&T.
- Follow the regular OTG setup and testing process.
- Use the serial number to confirm the correct brand.
- Do not substitute a regular OTG for a Micron unless the work order or an approved support contact specifically authorizes it.
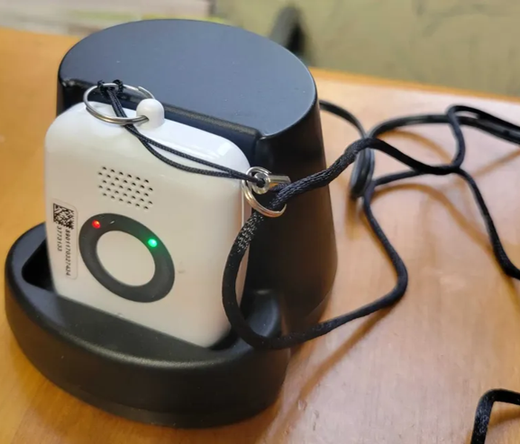
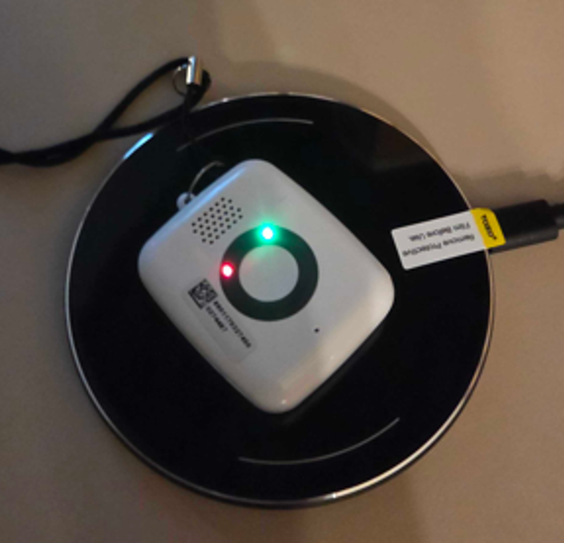
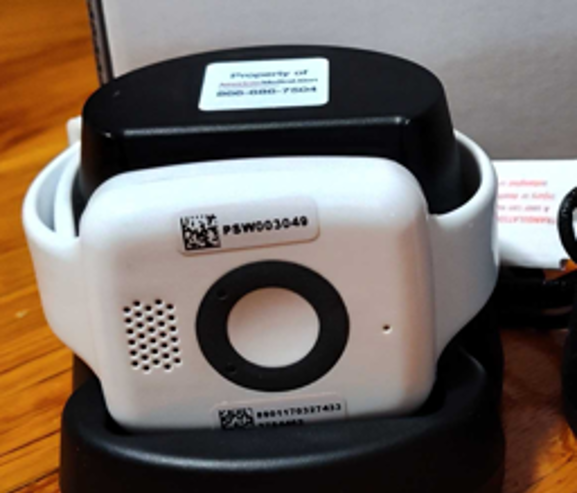
Mini Neck
- Use the regular OTG setup; the unit is simply smaller.
- The charger may be an oyster-style station or a flat Tozo disc.
- For an oyster charger, tell the subscriber not to leave the unit charging for an extended period.
Mini Wrist
- Use the same setup as the other mobile units.
- When available, bring a same-brand Mini Neck backup. Arthritis or wrist size can make the wrist unit unsuitable.
- Contact Activations for approval before exchanging it for a Mini Neck.
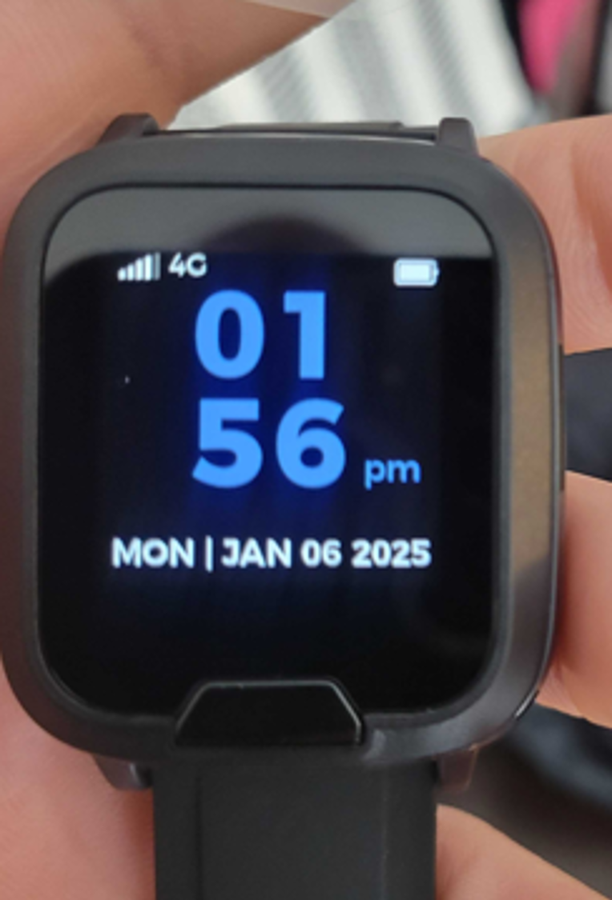
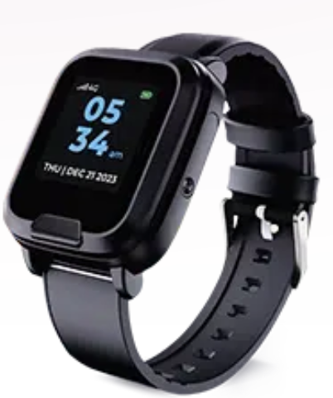
Smartwatch
- The CA Smartwatch is not offered on Member’s Choice work orders where the subscriber chooses between an in-home and mobile unit.
- Use the standard mobile-unit setup. The watch also displays steps, heart rate, and time.
- Charge the watch daily or when the battery is low using a suitable outlet not controlled by a switch.
- The approved guide documents holding Help for approximately three seconds. Follow the exact guide for announcements and cancellation.
- Volume defaults to 80%. Ask Activations to change it in the Anelto portal if needed.
- Do not raise volume above 96 because the unit is vulnerable to static beyond that setting.

Know it: The 7200C is an older Lifeline unit that is no longer available to order. Assure is the approved replacement identified in the training.
- Replacement 7200C buttons may still be ordered.
- Current documented replacements are 917 for the regular button and FS917 for the fall-detection pendant.
- 7200C wearable buttons are not interchangeable with other models from the same brand.
- The Lifeline guide distinguishes 6900/Assure buttons from older 7200C buttons.
- If the work order and available unit or button do not match, confirm the exact manufacturer and model and obtain approval before substituting.


Use the exact product guide. The approved training supports the checks below, not unlisted repairs or improvised programming.
PMD indicators and checks
- System OK blinking: A dose was missed. Remove the missed dose, use Status for information, and use Run to resume as directed.
- Displayed time blinking: Set the time using the PMD procedure.
- Support Center does not answer: Check for uninterrupted dial tone, telephone-cord connection, phones off hook, and mailbox status when applicable.
- Machine Error / Service: Use the documented red-light blink pattern. It may indicate a cup or lid jam, depleted battery, or modem/telephone problem. Follow the manual and contact PMD Support if unresolved.
MedReady supported checks
- A display that appears off may be caused by Away Mode; use the documented procedure to exit it.
- If the alarm works but the tray does not rotate, use Alarm Test and check the battery connection.
- If the tray rotates but medication position is wrong, check for incorrect tray loading and follow the documented counterclockwise loading sequence.
- Escalate when the documented checks do not correct the condition.
PMD Support: 1-888-632-3261. Do not attempt unsupported
repairs.

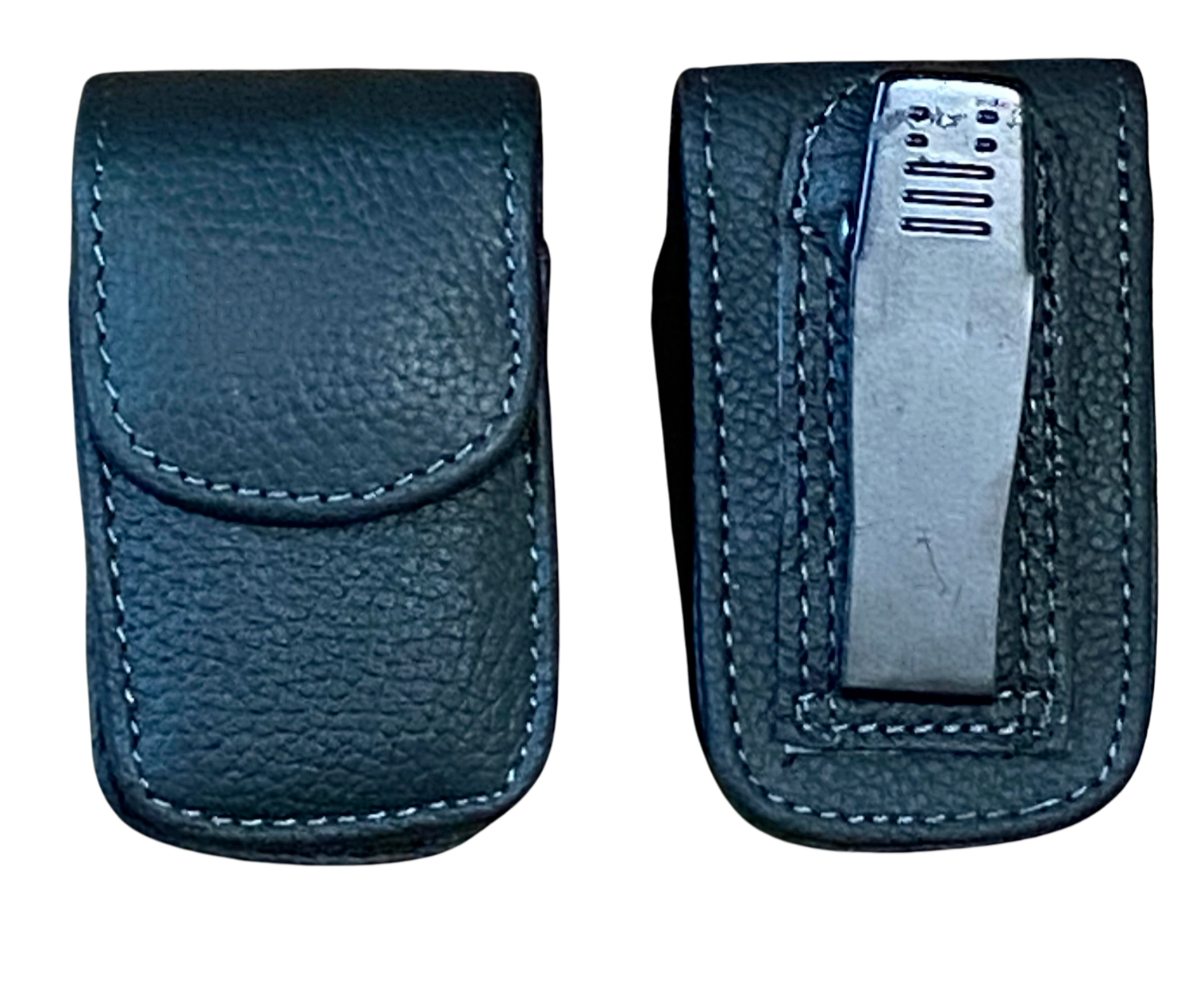
Pouches and lockboxes
- Offer an original OTG pouch when a waistband holder is preferred or needed because of a pacemaker, magnet, or similar concern.
- Offer a complimentary lockbox to every subscriber.
- Record the lockbox location and PIN on the paperwork. If the subscriber will not share it during installation, instruct them to call Lifeline or Connect America to add it for emergency personnel.
- If it will not fit on the door, use a sturdy railing, available gas-meter line, or hose bib where it cannot be easily removed.
Before leaving
- Complete the base-console and live wearable tests required for the assigned program.
- Confirm signal, range, charging, and help-button operation.
- Explain monthly testing and show the subscriber how to use the equipment.
- Explain that all wearable help buttons are water-resistant and should be worn in the shower or tub, where many falls happen. Do not describe them as safe for submersion unless the approved product guide specifically says so.
- Complete signatures, literature, checklist, notes, and final dispatch upload.
COMPLETE FIELD REFERENCE
Find the answer before you act
Use this reference with the current work order and exact equipment guide. If the answer is not supported here, stop and contact Service Point dispatch or the applicable support line.
DispatchProgram glossaryLights & testingWater protectionEducationInventoryContacts & hoursEscalationPaperwork
Use the same five checks on every appointment
- Confirm: work order, brand, model, job type, address, contacts, equipment, and current forms.
- Activate: attach the correct Unit ID/CSID through the approved route and turn volume up as needed.
- Install: use the exact model procedure, safe placement, and a working direct-wall outlet where required.
- Test and teach: complete the required live wearable test; explain Help, charging, monthly tests, water resistance, and fall-detection limits.
- Close: finish readable paperwork/proof, record equipment and serials, and post the result and next step in dispatch.
Field rule: If the work order, equipment, activation, testing, paperwork, or source material does not match, pause, document, and escalate. Do not improvise or substitute.
Slack, work orders, and dispatch
- Install Slack from the invitation sent after your background check, sign in using the email address you provided to Service Point during onboarding, and complete required authentication.
- Before accepting work, confirm you can open your assigned channels and work-order link, view scheduled and unscheduled orders, and identify the program, job type, and equipment.
- Slack is used for work-order updates, scheduling results, job questions, activation or equipment problems, completed work, and missing information.
- On a phone, landscape view may make work-order tables easier to read.
- Important updates must go through the designated dispatch process. A phone call or private message alone does not update the job record.
- Never place subscriber medical or other protected information in a public Slack message.
- Be factual, respectful, and clear. Do not promise compatibility, coverage, activation, or service results that have not been confirmed.
- Report incorrect contact information, refusal, inability to reach the subscriber, safety concerns, or any other barrier.
Delayed job update: Include your latest attempt, scheduled
appointment if applicable, why the job is not complete, whether
help is needed, and your next planned action. Aged jobs are
reviewed daily, so respond promptly when Service Point requests an
update.
Wear the button in the shower or tub
All wearable help buttons are water-resistant. The
subscriber should wear the button in the shower or tub because
many falls happen while bathing.
- Show the subscriber how to wear and press the button before leaving the home.
- Explain that water-resistant does not automatically mean waterproof or safe for prolonged submersion.
- Follow any additional restrictions in the exact device guide and contact dispatch if the equipment is damaged or uncertain.
Document and teach the approved guidance during subscriber education so the help button remains available without risking damage to the device.
How to request an appointment
Be professional, identify the reason for your call or text, and avoid sharing unnecessary subscriber information. Once the appointment is agreed upon, confirm the date and time and report the result in your assigned dispatch channel.
Phone-call example
“Hello, may I speak with [subscriber name]? My name is [technician
name] with Service Point. I’m calling on behalf of [Connect America
or Lifeline] to install a medical alert device ordered through
[program name, such as InnovAge]. What day and time work best for
you?”
After agreeing: “To confirm, your appointment is scheduled for [date] at [time]. Thank you. We look forward to assisting you.”
After agreeing: “To confirm, your appointment is scheduled for [date] at [time]. Thank you. We look forward to assisting you.”
Text-message example
“Hello [subscriber name], I’m reaching out to schedule an
appointment regarding your Lifeline equipment. Please call
[approved callback number] at your convenience so we can arrange a
date and time for a technician to visit your home. Thank you, and
we look forward to assisting you.”
Identify the brand on the work order
Connect America — CA Core
May appear as CA Core, RAPID, or Core. Use the CA Core activation route only for supported accounts and job types.
Connect America — AMAC
May appear as CA–AMAC, AMAC, COPS, PRC, Home Buddy, BSAH, or CA West. Confirm the work order before selecting equipment or support.
Lifeline
Follow Lifeline-specific equipment, activation, testing, and paperwork instructions. Do not identify the brand by equipment appearance alone.
Still unsure? Stop before activation or installation. Post
the exact wording shown on the work order in your assigned
assigned dispatch channel and ask Service Point to confirm the brand.
What the indicators mean
EquipmentIndicatorMeaning / action
Mytrex cellularSolid greenReady
Mytrex cellularBlinking greenAC power problem; running on battery. Check the outlet and
light-switch control.
Mytrex cellularSolid redAlarm is active. Wait for the response-center operator.
Mytrex cellularBlinking redWeak cellular signal. Relocate and follow the model reset
procedure until ready.
Mytrex landlineSolid greenReady
Mytrex landlineBlinking greenAC power problem or battery operation.
Mytrex landlineBlinking orangeAC power problem and no operating phone line.
Mytrex landlineSolid redAlarm is active.
Mytrex landlineBlinking redNo operating phone line; verify approved connections.
Lifeline AssureHelp bar blinkingAlarm or call activity.
Lifeline AssurePower solid redAC unavailable; unit is operating on battery.
Lifeline AssureCellular blinking greenWeak signal; relocate the unit.
Lifeline AssureCellular solid greenReady
Mobile deviceSolid red / blinking redCharging / low battery; charge promptly.
Mobile deviceSolid greenReady or fully charged.
Mobile deviceBlinking greenCharge is adequate but searching for service; allow it to
search and relocate if it continues.
Power-off reference
- Standard OTG, Mini Neck, and Mini Wrist: Press Help three times, then hold Help when the unit prompts you.
- Smartwatch: Use the touchscreen Power Off screen.
- Mytrex Cell: Move the rear O/I switch to O.
- Mytrex Landline: Disconnect power and the phone line, press T/L three times, then hold Help until the unit shuts down.
Required standard testing
Range-test source conflict: Current website guidance says
technicians explain range testing but do not perform it, while
approved checklists and several unit guides include technician
range-test steps. Follow the current work order or dispatch
direction. If it is not clear, ask before performing or omitting
the range test.
- Use a working outlet not controlled by a light switch and direct wall connection when required.
- Test the base-console and wearable button with a live agent. Perform a range test only when the current work order or dispatch direction requires it.
- Verify the applicable landline or cellular connection and signal.
- Remain connected after an accidental alarm and tell the operator it is a test.
- For a Lifeline 6900 range test, check important areas such as the bathroom. Relocation may improve range; never promise coverage that was not demonstrated.
- Mobile RSSI 0 through -100 is acceptable. At -101 through -125, recommend an in-home cellular or landline unit and obtain approval before any exchange.
What to explain before leaving
- If the operator cannot hear the subscriber or receives no response, the monitoring center follows the emergency protocol and sends emergency services to the subscriber’s service address.
- How to start a help signal
- Keep the wearable accessible
- Test the system monthly
- Press Help once; repeated presses may cancel the call
- Phone/cellular service and electrical-power dependence
- Notify the provider of service-location or device changes
- Lanyard breakaway considerations and the wrist option
- Equipment ownership
- Calls may be recorded
- Applicable Care Compass information
- Privacy, grievance, SIF, and responder materials
Fall detection
- The pendant must be worn to perform its intended function.
- Fall detection does not guarantee every fall will be detected.
- A standard button does not provide fall detection.
- When able, the subscriber should manually press Help after a fall.
Responder expectations
A responder should have a current number, be willing and able to check on the subscriber, tell the monitoring center whether they can respond, provide an estimated arrival time, and follow the program-specific responder instructions.
Treat every serial number as controlled inventory
- Confirm received brand, equipment type, quantity, serial numbers, and accessories.
- Report missing, damaged, or incorrect equipment promptly. Also report a duplicate inventory record when the same physical unit or serial number appears more than once unexpectedly. Multiple units of the same model in assigned stock are not automatically duplicates.
- Verify the shipping address when requesting equipment.
- Record all installed, removed, returned, or transferred equipment and serials.
- Keep programs and equipment families separated.
- Do not substitute, reuse returned equipment, or dispose of equipment without authorization.
- Retain tracking and report delivery problems. Tracking should be provided the same day a shipment is processed, and shipments in transit are reviewed daily.
Escalate: Equipment unavailable, urgent job at risk,
uncertain address, delayed/lost shipment, missing or invalid
serial, unreconciled ownership/location, missing paperwork,
work-order mismatch, or unclear return/reuse instructions.
Management confirmation required: Minimum stock quantities, return labels, RMA steps, and returned-equipment disposition are not fully defined in the training source.
MyConnect, VCAM/BYOD, and source limits
MyConnect mobile
- Black legacy/limited-field mobile unit; a CA West product-list example is MM04-0107.
- Use the device label for identity. Do not substitute it for another mobile unit without approval.
- Follow the exact assigned guide for indicator checks, battery review, activation, and live testing.
Lifeline VCAM/BYOD - Massachusetts
- BYOD extends eligible Lifeline PERS service through a compatible personal phone or tablet; a BYOD-only order does not receive a separate VCAM device.
- For a new installation, use the current VCAM Installation Checklist, verify the mobile number, document the IMEI, complete the required test video call, and obtain signatures.
- No app is required. Video is optional and needs SMS plus Wi-Fi or cellular data. The care specialist answers first; do not promise a direct nurse connection.
- If video fails, the PERS audio connection remains active. Do not troubleshoot unsupported problems on the subscriber's personal device.
Known source limits: The references do not fully define minimum stock, RMA/return steps, all PERS/PMD support numbers, or which RAPID route owns the listed hours. Confirm those items through dispatch or management.
Choose the route by brand—not appearance
Connect America materials may identify AMAC, PRC, Home Buddy, BSAH, or CA West. Lifeline is separate. Confirm the actual brand and work order before calling support.
AMAC/COPS1-877-266-0733Listed Sun-Sat, 8:00 a.m.-10:00 p.m. ET
RAPID/Core Activation1-800-220-9803The PDF places Mon-Fri, 8:00 a.m.-5:00 p.m. ET near the RAPID
lines; confirm which line the hours apply to.
RAPID/Core Bot610-486-5396Use only for a supported account/job
Technical Support1-800-215-4206
CA/Lifeline Language Line1-877-531-4060
Lifeline Activations / Unit Assignment(508) 625-7401Installer line effective September 2, 2026
PMD Support Center1-888-632-3261Listed Mon-Fri, 8:00 a.m.-6:00 p.m. CT
PMD paperwork submissionUse the assigned dispatch channel; do not fax
Lifeline VCAM/BYOD - eligible Massachusetts subscribers
- VCAM expands an existing Lifeline PERS service using the subscriber’s compatible phone or tablet.
- For BYOD-only orders, do not install a separate VCAM device.
- Confirm Lifeline, review the service, and verify the mobile number in the approved contact record.
- Explain that an SMS link may be used and no app is required. Leave applicable education. For every new VCAM installation, complete the current VCAM Installation Checklist and record the IMEI, testing, education, signatures, and visit times.
- Download the current VCAM Installation Checklist before the visit.
- The Lifeline button starts the normal response process. A care specialist may connect an appropriate non-emergency concern to a nurse; do not promise a direct nurse connection.
- Approved training lists nurse access as 24/7. Weak video does not end the PERS audio connection. Technicians are not expected to troubleshoot a subscriber’s personal phone or tablet.
Hours note: The source lists PERS Support as Monday-Saturday, 8:00 a.m.-7:00 p.m. CT but does not pair those hours with a separate phone number. Confirm the correct contact in dispatch.
Who to contact when you are stuck
Dispatch
Work-order mismatch, unclear program, missing information, paperwork/status question, subscriber barrier, approval, safety concern, or unresolved closeout.
Subscriber barrier means something preventing the visit or completion, such as no contact, refusal, unavailable access, language/communication needs, or a requested date that delays the order.
Activations
Attach Unit ID/CSID, confirm account eligibility, enable an approved feature, or complete the program’s activation process.
Technical Support
Activation is complete but documented setup, signal, pairing, or testing steps fail. Record the model, indicators, and exact result first.
Complete only the documented checks
Loss of power
Confirm model, working outlet, no light-switch control, required direct-wall connection, and model-specific lights. Escalate if unresolved.
Weak cellular signal
Confirm model, relocate for reception, verify the ready indication returns, and document RSSI or light status when required.
Landline fault
Verify documented connections and a working phone line. For the Lifeline 6900, follow approved phone-jack wiring; do not route through an answering machine, splitter, telephone, or other conflicting device.
Activation or test failure
Stay with supported steps, record the exact result, and contact the applicable support route or dispatch. Do not leave an unresolved system presented as complete.
Stop and escalate immediately when:
- Model identity is unclear or conflicts with the work order
- The guide does not support the next action
- Information is missing or records conflict
- An urgent job is at risk
- Activation or testing cannot be completed
- Supported troubleshooting does not fix the problem
- A safety concern or required approval exists
Ask Service Point for current direction: Exact RAPID line hours, PMD service-call paperwork exceptions, state-specific paperwork beyond Ohio, return/RMA procedures, and individual pay, mileage, zone, territory, or after-hours coverage.
Before accepting your first assignment
- Complete all training sections
- Identify the program and exact equipment model
- Schedule and report subscriber contact correctly
- Know the standard installation and testing sequence
- Use model-specific instructions
- Match paperwork to the job type
- Explain system use, monthly testing, and fall-detection limits
- Record equipment and serial numbers
- Know activation and support contacts
- Know when to stop and escalate
- Protect subscriber information
- Use approved communication channels
Training completion: Follow the completion instructions
provided by the Service Point PERS team. Do not accept assignments
until your training completion and dispatch readiness are
confirmed.
PAPERWORK TRAINING COURSE
Match every job to the right forms
Learn what each documented job type requires, how to complete the forms, and what must be corrected before a job can be closed.
0 of 7 lessons complete
Quick Job & Paperwork GuideReview this guide after completing the paperwork lessons.
JobRequired paperwork
Standard CA/LL installation or swapInstallation Checklist + HIPAA/Privacy + SIF; Grievance Policy
only for Michigan and Ohio
CA/LL service callSIF only
RemovalSIF only
Door knockNo paperwork required; proof photo required. An SIF with visit details is optional.
PMD installationSubscriber Activation Form + Terms & Conditions + HIPAA
Privacy Notice + PMD Installation Checklist
New VCAM installationVCAM Installation Checklist (current revision) plus any other
paperwork required by the work order
Michigan or Ohio installationStandard installation packet + correct state responder letter +
QR Code Document + Grievance Policy + two copies of the Notice of
Privacy Practices
Never choose paperwork by equipment appearance alone. Confirm the brand, job type, state or funding-program requirements, equipment, and the current work-order instructions first.
- Confirm whether the job is an installation, service call, swap, removal, or door knock.
- Confirm the brand: Connect America or Lifeline.
- Read the full work order for product-specific or state-specific forms.
- Use the current form revision supplied for that job.
- When the work order adds a specific requirement, include it with the standard packet for that job type.
- Arrive with all current forms. A service call can become an installation, so the correct paperwork must be available.
Standard installations and swaps require the same documents.
Required current packet
- Installation Checklist — complete every applicable installation, testing, education, and closeout item, including all required technician and subscriber signatures.
- HIPAA/Privacy Policy — explain it and obtain the required signature.
- Grievance Policy — required only for Michigan and Ohio; explain it and obtain the required signature when applicable.
- Subscriber Information Form (SIF) — complete current account, responder, instruction, equipment-return, and acknowledgment sections as applicable, including required technician and subscriber or authorized-representative signatures.
Required closeout
- For a swap, record the replacement equipment and returned-unit information accurately.
- Complete technician and subscriber signature fields.
- Enter the required date and time.
- Give the subscriber the applicable literature kit containing the HIPAA/Privacy Policy, applicable Michigan or Ohio Grievance Policy, and SIF.
- Upload clear, complete forms through the approved dispatch process.
Current-form rule: Always use the current approved version.
Never use outdated paperwork. If a ticket requests an older form,
pause and ask in your assigned dispatch channel.
Sections to review and complete as applicable
- Program/company identification — check the correct option
- Subscriber full name and subscriber number from the ticket
- Language, when applicable
- Date of birth — use it when teaching monthly testing
- Confirmed address — record corrections before submission
- Confirmed primary phone number — record corrections
- Directions when mapping tools give incorrect directions
- At least one confirmed responder; three are preferred
- Diagnoses and allergies, when applicable — protect this sensitive health information
- Special instructions, hidden-key location, and lockbox combination
- Retrieved Unit CSID for every unit removed onsite
- Required subscriber signature and date
A lockbox is encouraged and included with the subscriber's service at no additional charge. Retrieve only Lifeline or Connect America equipment unless the work order specifically directs you to retrieve another company's device.
Responder rule: The form provides three responder
sections. List every available personal responder in the order
the Monitoring Center should call them. If fewer than three are
available, follow the form's instructions for listing emergency
services in the preferred dispatch order. Do not invent responders.
Service calls and removals
Connect America and Lifeline service calls and removals require the SIF only.
- Do not require the full installation packet for these jobs.
- Update every applicable SIF section based on the visit.
- For a removal, complete the returned-unit and equipment information.
- Complete acknowledgments and signatures required by the current form.
- Submit a clear, complete copy in your assigned technician assigned dispatch channel immediately after the appointment.
Door knocks
Door knocks are the only job type that does not require paperwork.
- Take a photo that proves you were at the location.
- Upload the proof photo in your assigned dispatch channel.
- Post the visit result with the subscriber's full first and last name.
Before installation
- Enter the PMD unit serial number on the Subscriber Activation Form.
- Do not fax the form. Follow the current approved PMD workflow and instructions in the work order.
- Submit the PMD paperwork before the appointment whenever possible. If it was not submitted in advance, call in the PMD serial number during the appointment.
During and after installation
- Update the activation form as the checklist requires.
- Complete applicable signatures.
- Complete the Terms & Conditions, HIPAA Privacy Notice, and PMD Installation Checklist referenced by the current PMD process.
- Leave the required copy with the caregiver.
- Submit the completed packet through the approved Service Point dispatch process. Do not fax it.
Accuracy check: Verify every field before submission,
including subscriber and device information, Unit ID/CSID, PMD
serial number, signatures, dates, and all other required entries.
The PMD Support Center number shown in the approved product
manual is 1-888-632-3261.
Review your certifications: PMD/Med Dispenser setup and
paperwork training can be reviewed anytime on the
Connect America
certification dashboard.
- Bring the responder letter for the subscriber's state. Ohio and Michigan use different state-specific versions.
- Bring the QR Code Document. The same document may be used for both Ohio and Michigan subscribers.
- Leave the Grievance Policy with the subscriber.
- Bring two copies of the Notice of Privacy Practices. The subscriber must sign and date one copy for submission. Leave the second copy with the subscriber.
- Verify every required state document is present before leaving for the appointment.
Before submitting
- Confirm the subscriber, CRM/work-order number, brand, and job type match the ticket.
- Confirm every applicable field is complete; do not guess or leave unexplained blanks.
- Confirm equipment names and serial numbers match the equipment installed, returned, or serviced.
- Confirm required subscriber/authorized-representative and technician signatures.
- Confirm required date and time fields.
- Confirm every page is clear, readable, upright, and complete.
- Confirm required state/product documents are included.
- Submit in your assigned dispatch channel immediately after the appointment and provide factual visit notes.
Service Point reviews the submitted forms and documentation
before marking the work order complete.
FORMS & DOWNLOADS
Current technician paperwork
Download a blank copy before the visit. Always confirm the work order does not include an additional job-specific form.
VCAM Installation Checklist 2026
CA & LL Installation Checklist
CA & LL SIF 2026
CA & LL HIPAA/Privacy Form
Ohio Grievance Policy
Michigan Grievance Policy
Ohio Lifeline Responder Instructions
PMD Installation Packet
PMD Service Request Form
Michigan and Ohio: Use the correct state-specific responder
letter. Also bring the shared QR Code Document, the Grievance Policy,
and two copies of the Notice of Privacy Practices. Return one signed
and dated privacy copy and leave the second copy and Grievance Policy
with the subscriber.
TECHNICIAN FAQ
What do you need help with?
Search by a question, equipment name, form, job type, or problem. Use these answers with the assigned work order and current forms.
Last reviewed: September 16, 2026
What paperwork is required for a standard installation?
For Connect America and Lifeline, complete the Installation Checklist, HIPAA/Privacy form, and SIF. Add the Grievance Policy only for Michigan and Ohio. Complete required signatures, date, time in, and time out. Give the subscriber the applicable literature and upload the completed paperwork through the approved dispatch process.
Does a swap use the same paperwork as an installation?
Yes. A swap requires the same documents as a standard installation. Record the replacement equipment and returned-unit information accurately.
What paperwork is required for a service call or removal?
Service calls and removals require the SIF only. For a removal, complete the returned-unit and equipment information on the SIF.
What is a door knock, and when should I complete one?
A door knock is an in-person attempt to contact a subscriber at the service address after phone and text attempts have not reached them. Document the required contact attempts first. Do not decide on your own to perform a door knock; complete one only when the work order or Service Point dispatch directs you to do so.
What do I submit for a door knock?
Take a photo proving you were at the location and upload it in your assigned dispatch channel. Post the result with the subscriber's full first and last name. Door knocks do not require paperwork.
Which form should I use if an old copy is saved on my phone?
Use the current form provided for the job or download the current copy from this page. Do not use an older version when a current form is available.
Go to Forms & DownloadsWhere can I download the required paperwork and forms?
Open Forms & Downloads to select the current paperwork for the job. Confirm the brand, job type, and state requirements before downloading a form, and do not use an older copy saved on your phone when a current version is available here.
Go to Forms & DownloadsWhat must be completed on the SIF?
Complete and verify every applicable section: program/company, subscriber name and number, language, date of birth, confirmed address and primary phone, directions when needed, responders, diagnoses/allergies when applicable, special instructions, lockbox or hidden-key information, retrieved Unit CSID, subscriber signature, and date. Do not guess.
How many responders are required on the SIF?
The SIF provides three responder sections. When fewer than three personal responders are available, follow the form's instructions for listing emergency services in the preferred dispatch order. Do not invent responders.
Where do I document a lockbox?
Document the lockbox location and combination in the applicable special-instructions area. If the subscriber will not provide it during the visit, tell them to contact Lifeline or Connect America so it can be added for emergency personnel.
What is different about a PMD installation?
Submit PMD paperwork before the appointment whenever possible. If it was not submitted in advance, call in the serial number during the appointment. Verify every field for accuracy before submission. Do not fax PMD forms. Follow the approved PMD workflow and work-order instructions for forms, signatures, the caregiver copy, and submission through the assigned dispatch process. PMD setup and paperwork certifications can be reviewed anytime from the Connect America certification dashboard linked in the Forms section.
Are wearable help buttons waterproof?
All wearable help buttons are water-resistant and should be worn in the shower or tub because many falls happen while bathing. Teach this at every installation. Do not describe a button as waterproof or safe for prolonged submersion unless the approved guide specifically says so.
What additional paperwork is required in Michigan and Ohio?
Bring the correct state-specific responder letter, the shared QR Code Document, the Grievance Policy, and two copies of the Notice of Privacy Practices. The subscriber must sign and date one privacy copy for return; leave the second privacy copy and the Grievance Policy with the subscriber.
What if paperwork is missing, unreadable, or does not match the ticket?
Correct it before submitting. Confirm the subscriber, CRM/work-order number, brand, job type, equipment, serial numbers, signatures, dates, and required pages all match.
What should I do if the unit or instructions do not match the work order?
Do not improvise or use another model's procedure. Document the exact mismatch and contact your assigned dispatch channel before continuing.
Can I leave before the system is tested?
Do not leave until the required test is successfully completed with a live agent or the issue has been escalated. Confirm the device has good signal. Explain range testing to the subscriber; technicians do not perform the range test.
Are Assure pendants already paired?
It depends on the brand. Lifeline Assure units and pendants arrive separately, and every pendant must be paired after the unit is activated. Connect America Assure units ship with the pendant in the box, and that included pendant should already be paired. A service order may require pairing a replacement or additional pendant. Always perform the final test using the pendant, not the base unit's Help button.
How do I know whether to install AT&T or Verizon OTG?
Install the AT&T OTG unless the work order specifically says Verizon. CA AT&T units generally use an OTG serial prefix. Verizon units generally use OTV or have a Verizon identifier on the packaging. If fall detection is required, ask Activations to enable it in the unit.
Which buttons work with CA Mytrex units?
Regular Mytrex buttons work with both Mytrex Cell and Mytrex Landline. The documented white teardrop pendant with a red center provides fall detection and is also compatible with both CA Mytrex models. Do not assign it to an unverified zone; follow the approved pairing procedure and the unit announcement.
How do I pair an Anelto LTE wearable or charging cradle?
To pair a wearable help button or fall-detection pendant, press the Anelto LTE unit button five times, press the wearable button, and listen for pairing confirmation. To pair the charging cradle, place the unit in the cradle, press the handheld Help button four times, then unplug and reconnect the power cord. Cradles normally arrive pre-paired, so pair one only when specifically needed.
Is the CA Smartwatch available on Member’s Choice orders?
No. The CA Smartwatch is not offered on Member’s Choice work orders where the subscriber chooses between an in-home and a mobile unit. Follow the selections shown on the work order.
May I keep an unused CA Anelto wearable button?
Yes. An unused CA wearable button left from an installation may be retained for a later button-replacement work order. Keep it identified and separated as CA inventory.
What should I do after completing the visit?
Confirm paperwork is complete and readable, upload the required documents or proof photo in the assigned dispatch channel, post factual visit notes and the outcome, and report any unresolved equipment or account issue.
What must I report when a job is delayed?
Report your latest contact attempt, the appointment date if scheduled, why the job is not complete, whether you need help or escalation, and your next planned action. Every order needs a first update within 48 hours of receiving the order. The installation is required within three to five business days, and at least three attempts must be documented in dispatch.
When will I get paid for completed work?
Technicians are paid on Fridays for work from the prior week. For example, work from August 30 through September 5 would be paid on Friday, September 11.
What if the subscriber schedules more than one week out?
Post the requested appointment date and the subscriber’s explanation in your assigned dispatch channel. Service Point must report the reason to the agency because installations are time sensitive.
Can I send an update by private message or phone only?
No. Important job information must be reported through the designated dispatch process. A phone call or private message alone does not update the job record.
What does a blinking light mean?
It depends on the exact model and color. Use the Lights, Power & Testing table in the Field Reference. For example, blinking green can mean an AC power problem on a Mytrex base, weak cellular signal on Assure, or a mobile device searching for service. Confirm the model before acting.
What should I teach the subscriber about the help button?
Show how to start a help signal and tell them to press Help once because repeated presses may cancel the call. Explain that if the operator cannot hear them or receives no response, the monitoring center follows the emergency protocol and sends emergency services to the subscriber’s service address. Also explain monthly testing, keeping the wearable accessible, and the system’s dependence on power and phone or cellular service.
What must I explain about fall detection?
The fall-detection pendant must be worn, does not guarantee every fall will be detected, and is different from a standard help button. When able, the subscriber should manually press Help after a fall.
Are 6900, Assure, and 7200C buttons interchangeable?
Do not assume they are. The current Lifeline 6900 regular button is marked 312, and its fall-detection pendant is FS312. The documented 7200C replacements are 917 regular and FS917 fall detection. Confirm the exact model and obtain approval before using any replacement or substitution.
How do I power off mobile and Mytrex units?
Standard OTG, Mini Neck, and Mini Wrist units use three Help-button presses, then hold Help when prompted. Power off the Smartwatch through its touchscreen Power Off screen. For Mytrex Cell, move the rear O/I switch to O. For Mytrex Landline, disconnect power and the phone line, press T/L three times, then hold Help until the unit shuts down.
What should I do when equipment arrives?
Confirm the brand, type, quantity, serial numbers, and accessories. Report missing, damaged, or incorrect equipment promptly. A duplicate means the same physical unit or serial number appears more than once unexpectedly in the inventory record; several units of the same model are not automatically duplicates. Keep program equipment separated and never reuse, substitute, return, or dispose of equipment without approved direction.
What is Lifeline VCAM/BYOD?
For eligible Massachusetts Lifeline subscribers, VCAM can extend existing PERS service through a compatible phone or tablet. A BYOD-only order does not receive a separate VCAM device. For a new VCAM installation, complete the current VCAM Installation Checklist, verify the mobile number, document the IMEI, complete the required test video call, and obtain the required signatures. Explain the SMS-link process and do not promise that Help connects directly to a nurse. The checklist is available in Forms & Downloads.
What is the Language Line, and when should I use it?
The CA/Lifeline Language Line is telephone interpreter support for appointments where the technician and subscriber need help communicating in another language. Call 1-877-531-4060 when language assistance is needed and follow the provided prompts or support instructions. The Language Line supports communication with the subscriber; it does not replace the correct activation or technical-support line for the work order.
Where are the activation and support numbers?
Open Programs & Support in the Field Reference. It includes AMAC/COPS, RAPID/Core, the RAPID bot, Technical Support, Lifeline Activations, the Language Line, and PMD Support. Always select the route by the confirmed brand and work order—not by equipment appearance.
When must I stop and escalate?
Stop when the model is unclear or conflicts with the work order, the guide does not support the next step, information is missing or records conflict, an urgent job is at risk, activation or testing fails, documented troubleshooting does not work, a safety concern exists, or approval is required.
No matching answer found.
Try fewer words or search by the job type, form, equipment model, or problem. If the answer is not here, contact your assigned dispatch channel before continuing.
FIRST-JOB REVIEW
Review before your first visit
Use this section after completing equipment training. Open each topic, review the checklist, and mark it complete. Progress is saved on this device.
Start with the work order. Confirm the program, visit type, equipment listed, address, appointment window, and available contact instructions.
- Review the full work order before traveling.
- Verify you have the assigned equipment and required paperwork.
- Check equipment condition and needed accessories.
- Report missing or conflicting information before the visit.
Never rely on a procedure from a different customer program.
When instructions conflict, pause and contact the Service Point
team.
Connect America
Follow the Connect America work order and approved activation process. The CA-CORE automated flow supports eligible new installs; unsupported accounts, equipment mismatches, swaps, and replacements may require an agent.
Lifeline
Use Lifeline-specific equipment, testing, and paperwork instructions. Completed paperwork must be accurate and returned through the approved process.
Introduce yourself, explain the visit, and protect the subscriber’s space. Install only the assigned equipment according to its approved guide.
- Confirm the correct subscriber and equipment before setup.
- Choose a safe location with appropriate power and connectivity.
- Keep cords secure and walking paths clear.
- Do not leave until required testing is successfully completed or the issue is escalated.
Testing proves the system can communicate and helps the subscriber feel confident using it.
- Complete every program-required base and wearable test.
- Confirm the monitoring response follows the account protocol.
- Teach the subscriber how and when to use each device.
- For wearable-only testing, follow the program reminder and approved test procedure.
For Connect America protocol questions, verify the number on
file and ensure the Subscriber Information Form is current.
Follow the approved no-answer escalation procedure.
Your documentation must match the work order and what happened in the home.
- Record installed equipment and identifiers accurately.
- Complete all required fields—do not guess or leave unexplained blanks.
- Collect subscriber and technician signatures where required.
- Upload clear, readable documents and any required photos.
- Write factual notes describing the outcome and unresolved issues.
Before leaving, confirm the system, subscriber education, documentation, and team communication are complete.
- Clean the work area and account for unused equipment.
- Send the required status update and visit notes.
- Report unsuccessful visits, refusals, access problems, or equipment issues promptly.
- Do not mark a job complete if required work or documentation is still outstanding.
QUIZ READINESS REVIEW
Every quiz answer is covered here
Review these required rules before opening the final knowledge check.
- Update every assigned order within 48 hours.
- Document at least three contact attempts when the subscriber cannot be reached.
- If an appointment is more than one week out, report the date and explanation in dispatch.
- A swap requires the same documents as a standard installation.
- A removal requires the SIF.
- A door knock requires a proof photo in the assigned dispatch channel.
- Plug equipment directly into a wall outlet.
- If equipment or instructions do not match the work order, stop, document the mismatch, and contact dispatch.
- Install an AT&T OTG unless the work order specifically says Verizon.
- A job is complete only after installation, testing, education, documentation, and the final update.
- The installation window is three to five business days.
- Post subscriber information and completed SIFs only in the assigned dispatch channel.
- Submit PMD paperwork through the approved dispatch process; do not fax it.
- All wearable help buttons are water-resistant and should be worn in the shower or tub.
FINAL KNOWLEDGE CHECK
Complete training to unlock the quiz
0 of 25 completeTraining required
The 14-question quiz is a separate form. It becomes available after every required training item is complete.
Quiz lockedHELP US IMPROVE
Tell us about this training
Rate the website and share anything that was unclear, missing, difficult to use, or especially helpful. Your feedback will be reviewed as we update the training.
WHEN SOMETHING DOESN'T MATCH
Pause. Document. Escalate.
Do not improvise account, activation, equipment, or safety procedures. Record the exact issue and contact your assigned dispatch channel or management contact.